

Toasted Coconut Chocolate Delight: A Decadent Treat for Dessert Lovers
Coconut and chocolate have long captured the hearts of dessert aficionados, combining rich, tropical flavors with the deep, indulgent notes of cocoa. This classic duo not only adds a touch of sweetness to any dish but also brings a delightful contrast in texture that can elevate simple sweets to extraordinary delights. Among the many recipes that celebrate this harmonious pairing, Toasted Coconut Chocolate Delight stands out as a truly scrumptious treat that is sure to please.
Toasted Coconut Chocolate Delight is more than just a dessert; it’s an experience that envelops the senses. The combination of chewy toasted coconut and smooth, melted chocolate creates a mouthwatering treat that resonates with both nostalgia and innovation. Whether you’re hosting a gathering, preparing a special dessert for a loved one, or simply indulging your sweet tooth, this recipe promises to deliver satisfaction with every bite.
One of the most appealing aspects of Toasted Coconut Chocolate Delight is its unique blend of textures and flavors. The crunchiness of the toasted coconut contrasts beautifully with the creamy richness of the chocolate, while the sweetness from the condensed milk ties it all together. This multifaceted treat is not only delicious but also visually appealing, making it an excellent choice for presentation at any event.
Despite its impressive flavor profile, the Toasted Coconut Chocolate Delight is surprisingly simple to prepare. The ingredients are accessible, and the preparation steps are straightforward, making it an ideal recipe for both novice bakers and seasoned chefs alike. As you embark on this delightful culinary journey, you’ll discover that creating a gourmet dessert at home doesn’t have to be an arduous task.
Understanding the Ingredients
Before diving into the preparation of Toasted Coconut Chocolate Delight, it’s essential to understand the role of each key ingredient that contributes to the overall flavor and texture of this dish.
1. Sweetened Shredded Coconut: This ingredient is at the heart of the recipe, providing a chewy texture and a rich coconut flavor. The sweetness of the shredded coconut enhances the overall taste of the dessert, while its toasted version adds a nutty aroma, elevating the dish to new heights.
2. Sweetened Condensed Milk: Acting as both a binder and a sweetener, sweetened condensed milk is crucial for achieving the perfect consistency in the coconut mixture. It not only helps to hold everything together but also infuses the dessert with creamy sweetness that complements the coconut and chocolate beautifully.
3. Egg Whites: The inclusion of egg whites is essential for achieving a light and airy texture in the macaroons. When whipped to the right consistency, they incorporate air into the mixture, creating a fluffy and delicate bite that contrasts nicely with the chewiness of the coconut.
4. Semi-Sweet Chocolate Chips: Chocolate lovers will appreciate the richness that semi-sweet chocolate chips bring to this recipe. Their melt-in-your-mouth quality enhances the overall flavor profile and adds a luscious finish to each piece of Delight.
5. Optional Coconut Oil: While not mandatory, a touch of coconut oil can be used to ensure the chocolate melts smoothly. This oil adds a subtle coconut flavor and helps achieve a glossy finish on the chocolate coating.
6. Quality Ingredients: The success of any recipe often hinges on the quality of its ingredients. For the best outcome, opt for high-quality sweetened shredded coconut and semi-sweet chocolate chips to truly elevate the flavors.
Step-by-Step Guide to Preparing Toasted Coconut Chocolate Delight
Preheating the Oven
The first step in creating your Toasted Coconut Chocolate Delight is to preheat your oven. Setting the right temperature is crucial for even baking, ensuring that the coconut toasts perfectly without burning. Aim for a temperature of 350°F (175°C), which is ideal for achieving a golden brown exterior while maintaining the chewy interior.
Before placing your mixture in the oven, take a moment to prepare your baking sheet. Lining it with parchment paper will not only help prevent sticking but also make for easy removal of the finished product. This simple step ensures that your delightful treats maintain their shape and appearance when it’s time to serve.
Mixing the Coconut Base
Next, it’s time to prepare the coconut base for your delightful treats. In a mixing bowl, combine the sweetened shredded coconut and sweetened condensed milk. Thoroughly mix the two ingredients until the coconut is evenly coated with the condensed milk. This step is essential for achieving the right consistency; you want the mixture to be sticky enough to hold together while still allowing the coconut to shine through.
As you mix, pay attention to the texture. The goal is to have a cohesive mixture that clumps together when squeezed in your hand but is not overly wet. If it feels too dry, a small drizzle of additional sweetened condensed milk may help achieve the perfect balance.
Whipping Egg Whites
Now, let’s move on to whipping the egg whites. In a separate clean, dry bowl, add the egg whites and begin to beat them using an electric mixer or a whisk. The key here is to achieve stiff peaks, which means the egg whites should hold their shape when you lift the whisk. This process incorporates air into the egg whites, contributing to the lightness of the final product.
It’s important to whip the egg whites slowly at first until they begin to froth, then increase the speed as they begin to thicken. Keep an eye on them to avoid over-whipping, as this can lead to a dry texture rather than the fluffy consistency we desire.
Combining the Mixtures
With both your coconut base and whipped egg whites prepared, it’s time to combine the two mixtures. This step requires a gentle hand to maintain the airiness of the egg whites. Using a spatula, carefully fold the whipped egg whites into the coconut mixture. Begin by adding a small portion of the egg whites to lighten the coconut base, then gradually incorporate the remaining egg whites.
The folding technique is crucial here; you want to maintain the volume of the egg whites while ensuring that the coconut mixture is evenly combined. Continue folding until the two mixtures are fully integrated, but take care not to overmix, as this can deflate the fluffy texture you’ve worked so hard to achieve.
In this first part of the Toasted Coconut Chocolate Delight recipe, we have explored the delightful combination of coconut and chocolate, the significance of each ingredient, and the initial steps in the preparation process. Stay tuned for the next part, where we will delve deeper into baking and finishing touches of this exquisite treat.
Tips on Observing the Mixture for the Right Consistency
Achieving the perfect consistency for your macaroon mixture is crucial to ensure they hold their shape while baking. The mixture should be sticky but not overly wet. When you mix the shredded coconut, sweetened condensed milk, and vanilla extract, the ingredients should combine into a cohesive mixture that clumps together when pressed. If the mixture feels too dry, you can add a little more sweetened condensed milk. Conversely, if it seems too wet, a small amount of additional shredded coconut can help absorb excess moisture. Keep a close eye on the texture, as it greatly influences the final product.
Shaping the Macaroons
Once your mixture is well-combined, it’s time to shape the macaroons. This step can be fun and creative, allowing you to form the treats into the desired size and shape.
Suggested Tools for Shaping
You have two primary options for shaping your macaroons: using a cookie scoop or your hands. A cookie scoop is an excellent tool for achieving uniform sizes, making it easier to ensure that each macaroon bakes evenly. Simply scoop the mixture and release it onto your baking sheet. On the other hand, if you prefer a more hands-on approach, you can roll the mixture into balls or mounds using your hands. This method adds a personal touch but may lead to slight variations in size.
Importance of Spacing for Even Baking
When placing the shaped macaroons on your baking sheet, proper spacing is crucial. Leave about 1 to 2 inches between each macaroon. This spacing allows them to expand slightly as they bake without merging into one another. It also ensures that hot air circulates around each macaroon, promoting even baking and a desirable golden brown finish.
Baking the Macaroons
Preheat your oven to 325°F (163°C) before baking your macaroons. Once your macaroons are shaped and spaced on the baking sheet, it’s time to pop them in the oven.
Visual Cues for Doneness
The baking time typically ranges from 15 to 20 minutes, depending on your oven’s specifics. Keep an eye on them during the last few minutes of baking. The macaroons are done when their tops are golden brown, and the edges start to crisp up. They may look slightly puffed up but will settle as they cool.
Recommended Cooling Time and Process for Best Texture
After removing the macaroons from the oven, let them cool on the baking sheet for about 5 minutes. This brief cooling period allows them to firm up before transferring them to a wire rack. Allow the macaroons to cool completely on the rack to ensure they achieve the right texture. This step is crucial, as it will prevent them from becoming soggy once dipped in chocolate.
Chocolate Dipping Process
Once your macaroons are completely cooled, it’s time to prepare for the chocolate dipping process.
Preparing to Melt Chocolate
Select high-quality chocolate for dipping; semi-sweet or dark chocolate works best for a rich contrast to the sweetness of the macaroons. Chop the chocolate into small, even pieces to ensure it melts smoothly.
Best Practices for Melting Chocolate in the Microwave
To melt chocolate in the microwave, place the chopped chocolate in a microwave-safe bowl. Heat the chocolate on medium power for 30 seconds, then remove and stir. Repeat this process until the chocolate is mostly melted, and then continue stirring until it is completely smooth. This method helps to prevent overheating, which can lead to a grainy texture.
Discussion About Alternative Melting Methods (Double Boiler)
If you prefer a more traditional method, you can melt chocolate using a double boiler. Fill a pot with a few inches of water and bring it to a simmer. Place a heatproof bowl on top of the pot, ensuring it doesn’t touch the water. Add the chopped chocolate to the bowl and stir occasionally until melted. This method provides gentle, even heat, reducing the risk of burning the chocolate.
Dipping Techniques
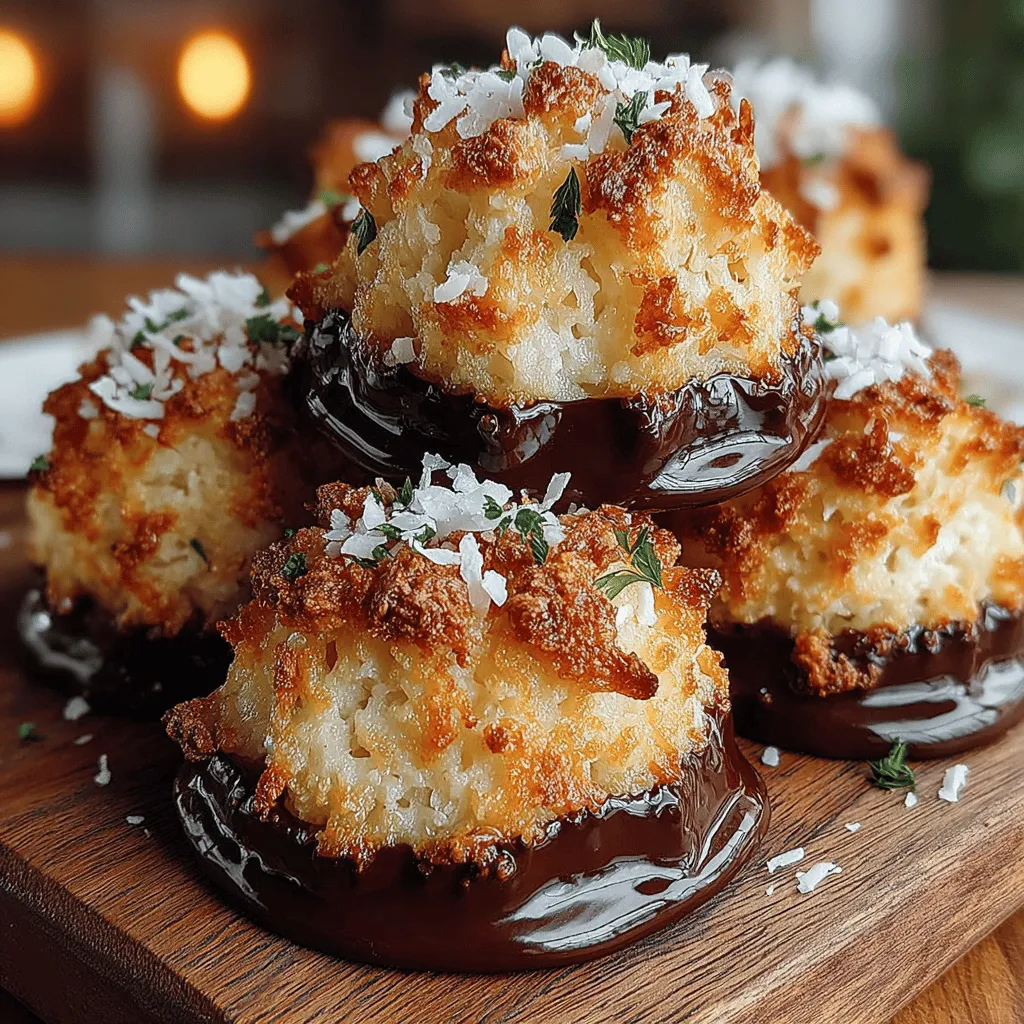
When dipping the macaroons in chocolate, hold each macaroon by the base and dip it halfway into the melted chocolate. Allow any excess chocolate to drip off before placing it back on the wire rack. This technique ensures an even coating without overwhelming the coconut flavor.
Optional Sprinkling of Extra Coconut for Added Texture and Flavor
For an extra touch, consider sprinkling a bit of toasted coconut on top of the dipped chocolate while it’s still wet. This not only enhances the presentation but also adds texture and reinforces the coconut flavor.
Setting and Storing the Macaroons
After dipping, it’s essential to let the chocolate set properly. Chilling the macaroons will help the chocolate harden and ensure they maintain their shape.
Importance of Chilling to Set the Chocolate
Place the dipped macaroons in the refrigerator for about 15-30 minutes to allow the chocolate to fully set. This step is crucial, as it prevents the chocolate coating from smudging when handled.
Best Practices for Storing Macaroons to Maintain Freshness
Once set, store your macaroons in an airtight container. Layer them between sheets of parchment paper to prevent sticking. Proper storage will keep them fresh for up to a week at room temperature or longer if refrigerated.
Suggestions for Serving and Presentation Ideas
These Toasted Coconut Chocolate Delights are perfect for any occasion. Consider serving them on a decorative platter for parties or packing them in a gift box for a thoughtful treat. They also make an excellent addition to dessert tables at celebrations and holidays, where their delightful appearance and flavors will impress guests.
Nutritional Information
These macaroons not only taste delicious but also offer some nutritional benefits, thanks to their key ingredients.
Overview of the Nutritional Benefits of Key Ingredients
Coconut, a primary ingredient in this recipe, is rich in fiber and healthy fats, making it a satisfying choice for sweet treats. Additionally, the use of sweetened condensed milk provides a creamy texture while adding sweetness and a hint of caramel flavor.
Coconut’s Health Benefits (Fiber, Healthy Fats)
Coconut is known for its potential health benefits, including promoting heart health due to its medium-chain triglycerides (MCTs), which can provide a quick source of energy. The fiber content in coconut also supports digestive health, making these macaroons a more wholesome option compared to many traditional cookies.
The Role of Moderation in Enjoying Sweet Treats
While these macaroons contain healthful ingredients, they are still a sweet treat. Enjoying them in moderation is key. Each macaroon has approximately 100 calories, so plan your serving size accordingly. A couple of macaroons are perfect for a sweet snack without overindulging.
Conclusion
The Toasted Coconut Chocolate Delight combines the rich, sweet flavor of chocolate with the tropical essence of toasted coconut, creating a truly delightful treat. The ease of preparation makes this recipe accessible to home bakers of all skill levels, allowing you to whip up a batch in no time. Whether you’re looking for a casual snack or a festive dessert for special occasions, these macaroons are sure to please. So gather your ingredients, follow these simple steps, and enjoy the delightful combination of flavors and textures in each bite.
