

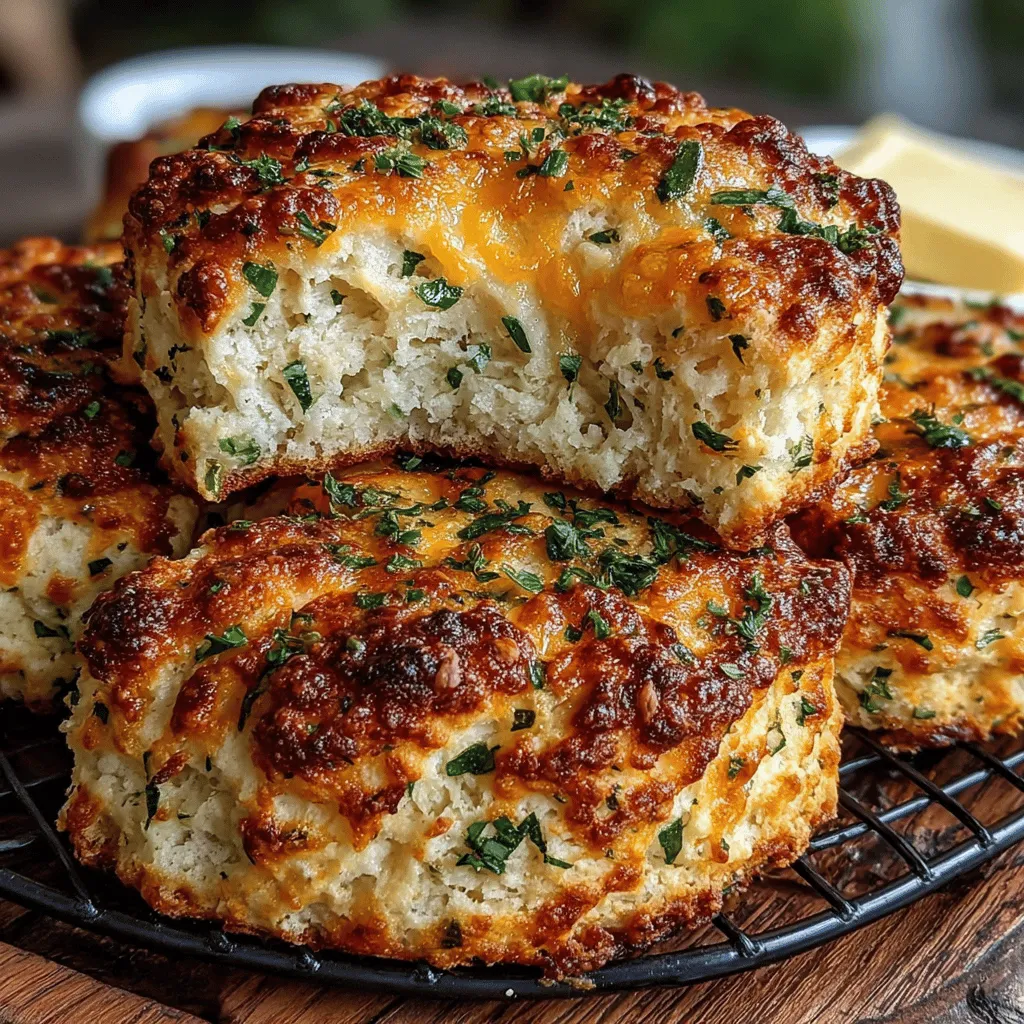
Cheesy Herb Bliss Biscuits: A Comforting Treat for Any Occasion
When it comes to comfort food, few things can compare to the warm, flaky goodness of freshly baked biscuits. Among the myriad of biscuit recipes, Cheesy Herb Bliss Biscuits stand out for their delightful combination of flavors and textures. These biscuits are not just a treat; they’re an experience that brings people together, whether they’re served at a family brunch, a holiday gathering, or enjoyed quietly with a cup of tea. The sharpness of cheddar cheese perfectly mingles with the freshness of herbs, creating a savory delight that captivates the palate.
What makes Cheesy Herb Bliss Biscuits particularly appealing is their versatility. They can complement a variety of meals, from hearty soups to elegant salads, or simply be savored on their own. The ease of preparation means that even novice bakers can whip up a batch without breaking a sweat. With minimal ingredients and straightforward steps, these biscuits promise a rewarding baking experience that will fill your home with an irresistible aroma.
The Allure of Cheesy Herb Bliss Biscuits
The magic of Cheesy Herb Bliss Biscuits lies in their unique flavor profile. As you bite into these golden treasures, the rich, cheesy goodness envelops your taste buds, while the fresh herbs invigorate each mouthful with a burst of flavor. The combination creates a taste sensation that elevates even the simplest meals, making them feel gourmet.
Imagine enjoying a warm biscuit slathered with butter, or using it as a base for a savory breakfast sandwich. They can also serve as the perfect sidekick to a bowl of chili or a creamy soup, adding a luxurious touch to your dining experience. Beyond their culinary applications, these biscuits evoke a sense of nostalgia, reminding many of family gatherings and comforting home-cooked meals. For those who appreciate both flavor and tradition, Cheesy Herb Bliss Biscuits are an indispensable addition to any recipe collection.
Understanding the Ingredients
Creating the perfect Cheesy Herb Bliss Biscuits requires a harmonious balance of ingredients. Each component plays a crucial role in achieving the desired texture, flavor, and overall appeal of the biscuits.
– All-Purpose Flour: The backbone of the biscuit, all-purpose flour provides the necessary structure. Its versatility makes it ideal for baking, ensuring that the biscuits have a tender yet sturdy base. The right amount of flour is essential; too much can lead to dense biscuits, while too little may result in a flat outcome.
– Baking Powder and Baking Soda: These two leavening agents are vital for achieving a light and fluffy texture. Baking powder provides an immediate rise, while baking soda works best in combination with acidic ingredients, such as buttermilk. Together, they create the perfect lift, allowing the biscuits to rise beautifully in the oven.
– Unsalted Butter: The key to flaky biscuits lies in the use of cold, unsalted butter. When mixed into the flour, the butter creates small pockets of fat that, when baked, result in a tender, flaky texture. Using unsalted butter gives you full control over the saltiness of the finished product, allowing the herb and cheese flavors to shine.
– Cheddar Cheese: Sharp cheddar cheese is the star ingredient in these biscuits, providing a robust flavor that stands out. Its melting qualities contribute to the gooey texture within the biscuit, creating a delightful contrast to the flaky exterior. The sharpness of the cheese also enhances the overall depth of flavor, making each bite a savory treat.
– Fresh Herbs (Chives and Parsley): Fresh herbs are essential for adding brightness and complexity to the biscuits. Chives provide a subtle onion-like flavor, while parsley adds a fresh, grassy note. Together, they create a well-rounded herbaceous profile that complements the cheese and elevates the overall taste experience.
– Buttermilk: This ingredient adds moisture and a slight tang, which helps to tenderize the biscuits. The acidity in buttermilk reacts with the baking soda, enhancing the leavening process. The result is a biscuit that is both light and flavorful, with a rich, creamy texture.
Step-by-Step Guide to Making Cheesy Herb Bliss Biscuits
Now that you’re familiar with the ingredients that make these biscuits special, it’s time to dive into the preparation process. Follow these steps to create your own batch of Cheesy Herb Bliss Biscuits.
Preheating the Oven
Before you begin mixing your ingredients, it’s crucial to preheat your oven. Preheating ensures that the biscuits bake evenly and achieve the perfect golden-brown color. Set your oven to the recommended temperature (typically around 425°F or 220°C) and allow it to reach the desired heat before placing your biscuits inside. This step cannot be overlooked, as an improperly heated oven can result in undercooked or unevenly baked biscuits.
Now that the oven is heating up, gather your ingredients and prepare to embark on a delightful journey of biscuit-making. Stay tuned for the next steps, where we’ll guide you through mixing, shaping, and baking these Cheesy Herb Bliss Biscuits to perfection.
Mixing Dry Ingredients
The first step in creating the perfect Cheesy Herb Bliss Biscuits is to mix the dry ingredients thoroughly. This process is crucial for achieving a consistent texture throughout the biscuits. The dry mix typically consists of all-purpose flour, baking powder, baking soda, salt, and your chosen dried herbs.
Start by sifting the flour and baking powder together in a large mixing bowl. Sifting not only helps to aerate the flour but also ensures that the leavening agents are evenly distributed, which is essential for the biscuits to rise properly. Next, add in the salt and any dried herbs you are using, such as dried oregano or thyme. Using a whisk, gently stir the mixture until all the ingredients are well combined. This step is important because it prevents clumps of baking powder or salt from forming, leading to an even flavor in every bite.
Cutting in the Butter
Once the dry ingredients are ready, it’s time to cut in the butter. This technique involves incorporating cold, cubed butter into the flour mixture to create a flaky texture. The butter should be very cold, straight from the refrigerator, as this helps to create layers in the biscuit dough.
Using a pastry cutter or two forks, press the cold butter cubes into the flour mixture until it resembles coarse crumbs. You want to see small pieces of butter throughout the mixture, as this will melt during baking, creating steam and resulting in those delightful flaky layers that are characteristic of a great biscuit. Be careful not to overwork the mixture; you should still see some small chunks of butter for the best texture.
Incorporating Cheese and Herbs
Next comes the star ingredients: cheese and fresh herbs. Adding shredded cheese—such as sharp cheddar or Gruyere—into the dry mixture enhances the flavor and adds a rich creaminess to each biscuit. It is best to use cheese that has been freshly grated, as pre-packaged shredded cheese often contains anti-caking agents that can affect the texture.
To evenly distribute the cheese and herbs, gently fold them into the dry mixture using a spatula or wooden spoon. Be sure to do this carefully to avoid breaking down the cheese or overworking the dough. Fresh herbs, such as chopped chives or parsley, can be added at this stage, bringing a burst of freshness to the biscuits. Mixing these ingredients thoroughly will ensure that every biscuit is packed with flavor.
Mixing in Buttermilk
The next crucial step is to incorporate the buttermilk into the dough. Buttermilk not only adds moisture but also contributes to the lightness and tenderness of the biscuits. When adding the buttermilk, pour it into the dry mixture gradually, stirring gently with a spatula.
It’s important to mix just until the dough comes together. Overmixing at this stage can lead to tough biscuits, as it develops the gluten in the flour. The goal is to have a slightly sticky dough that holds together but is not overly wet. If the dough seems too dry, you can add a splash more of buttermilk, but be cautious not to overdo it.
Shaping the Biscuits
With your dough ready, it’s time to shape the biscuits. Turn the dough out onto a lightly floured surface and gently pat it into a rectangle about ¾ inch thick. Avoid rolling the dough with a rolling pin, as this can compress it and lead to denser biscuits. Instead, use your hands to shape it, which helps maintain the light texture.
Using a sharp biscuit cutter or a round glass, cut out biscuits from the dough. Press straight down without twisting the cutter, as twisting can seal the edges and prevent the biscuits from rising properly. Place the cut biscuits on a parchment-lined baking sheet, making sure to leave some space in between each one to allow for expansion during baking.
Baking Process
When it comes to baking, the temperature and spacing of the biscuits are paramount for achieving that perfect golden brown finish. Preheat your oven to 425°F (220°C) to ensure it is hot enough to create steam, which is essential for fluffy biscuits.
Arrange the biscuits on the baking sheet with enough space between them, about 1-2 inches apart. This allows the hot air to circulate and ensures even cooking. Bake them in the preheated oven for about 12-15 minutes or until they are golden brown on top. Keep an eye on them towards the end of the baking time; they should be puffed up and lightly browned. A toothpick inserted into the center of a biscuit should come out clean, indicating they are fully cooked.
Serving Suggestions for Cheesy Herb Bliss Biscuits
Once your Cheesy Herb Bliss Biscuits are out of the oven and cooled slightly, it’s time to enjoy them! These biscuits are incredibly versatile and can be served in various ways.
Pairing with Spreads
For a delightful treat, consider pairing your biscuits with different spreads. Whipped honey butter is a favorite choice, as its sweetness complements the savory cheese and herb flavors. You can also opt for fruit jams or preserves, which add a contrasting sweetness that elevates the overall taste.
Savory spreads, such as cream cheese or herb-infused butter, are fantastic options too. They enhance the flavor profile and create a rich, creamy texture that pairs wonderfully with the flaky biscuits.
Accompanying Dishes
Cheesy Herb Bliss Biscuits shine in many culinary settings. They make an excellent addition to brunch tables alongside scrambled eggs or breakfast casseroles. For lunch or dinner, serve them as a side to hearty soups or stews, where their fluffy texture can soak up delicious broths.
These biscuits are also perfect for holiday dinners, complementing roasted meats or vegetarian dishes. Their savory flavor profile pairs beautifully with traditional holiday sides, offering an alternative to bread rolls.
Storage Tips for Leftover Biscuits
If you have any leftover biscuits, it’s essential to store them properly to maintain their freshness.
Refrigeration and Freezing
To store uneaten biscuits, place them in an airtight container at room temperature for up to 2 days. If you want to keep them longer, consider refrigeration. Wrap the biscuits in foil or place them in a sealed container in the refrigerator, where they can last for about a week.
For longer storage, freezing is the best option. Place the cooled biscuits in a freezer-safe bag or container, separating them with parchment paper to prevent sticking. They can be stored in the freezer for up to three months. When you’re ready to enjoy them, simply reheat the biscuits in a 350°F (175°C) oven for about 10-15 minutes, or until warmed through.
Life Span
In terms of lifespan, biscuits stored at room temperature typically last 1-2 days, while refrigerated biscuits can last up to a week. Frozen biscuits can maintain their quality for about three months; however, for the best flavor and texture, it’s recommended to consume them within the first month of freezing.
Conclusion
Making Cheesy Herb Bliss Biscuits is not only a rewarding culinary experience but also a delightful way to bring comfort and joy to your dining table. The combination of flaky texture, savory cheese, and fragrant herbs results in a biscuit that is sure to impress family and friends alike.
Whether enjoyed fresh out of the oven with a smear of honey butter or served alongside your favorite meals, these biscuits are versatile enough to fit any occasion. Embrace the joy of home baking and share this comforting dish with those you love. We encourage you to try this recipe for yourself and experience the deliciousness of Cheesy Herb Bliss Biscuits. Happy baking!